


Video is the most effective way to get your message to members. Not only is the average smartphone user more likely to watch a video than read a post, science has found that people retain more information from video content.
But before you start sending and posting videos, there are a few things to consider to ensure that your video communications are successful—and not a waste of your time and resources.
Where to start
“My local associations often ask how to get into video production when they cannot afford to hire a contractor and want to do it in-house,” says Steve Klaniecki, director of marketing and communications at Washington REALTORS®. Local AEs tell him their biggest concerns are:
- Cost of equipment and software to get started
- Not knowing how to edit and post video
- Not having the time to film, edit, and learn new software
- Not having the space for a studio
I’ve found that cost is rarely an obstacle when you’re just getting started. You can pay thousands for sophisticated equipment, but all you really need is your smartphone and basic video tips that you can find on YouTube.
But first, I want to emphasize that posting bad video content (and I’ll describe that in a second) is worse than not doing video at all, so make sure that your videos are well planned and not spur of the moment.
Separating the good from the bad
“The number one thing not to do in video is have bad audio,” says Eric Berman, former communications director at the Massachusetts Association of REALTORS®. “People can accept jumpy footage and even the picture not being that great, but if the audio isn’t good, they’re going to shut it off right away.”
One thing I’ve run into when making videos for my association is an environment that’s not conducive to quality audio. Many of us have an office with poor acoustics or random noise that would be picked up on a regular camera.
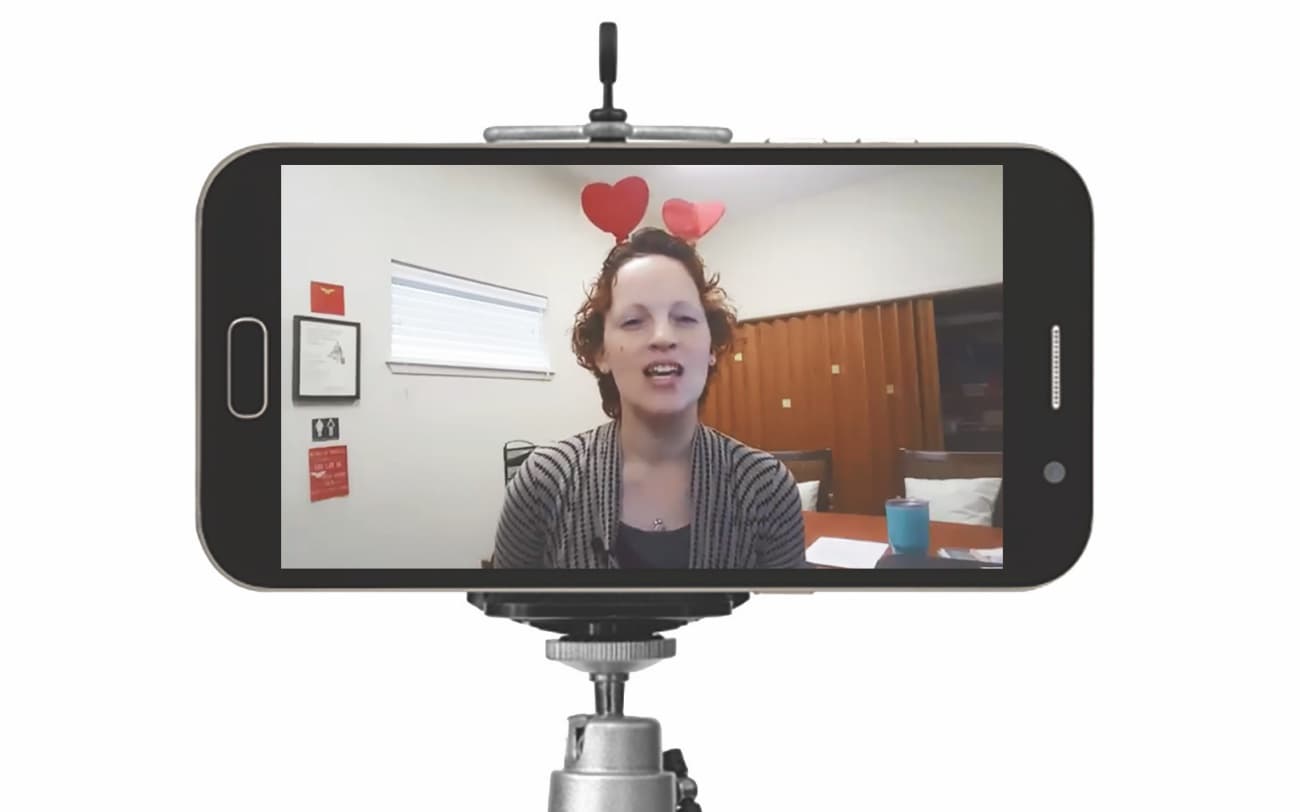
A quick fix to most audio problems is a simple and inexpensive microphone that can cost less than $20 and offer high-quality sound. I use a lapel mic when I make videos and plug it directly into my smartphone. (The Rode smartLav+ is a lavalier, or tie-clip mic, specifically built for smartphones.)
Your smartphone camera is good enough

I still do most of my videos with my smartphone even though we’ve invested in a larger camera. With the proper setup, my phone can produce videos that are at the same quality as those with the larger camera.
If you are ready to move up to a camera with better resolution, you can find great options for less than $500, including the Canon PowerShot and Canon EOS Rebel. Canon even has a YouTube channel at CanonUSA featuring videos on how to make videos with its cameras.
Another option is to use your laptop’s built-in webcam and recording features. If your laptop doesn’t have a camera, or you want one with more features such as autofocus, light correction, or full HD video, buy a stand-alone webcam for your PC for as little as $35. Plug your webcam and your mic into your laptop, open a free video app, such as Windows Camera (PC) or QuickTime Player (Mac), and you’re ready to go.
Filming tips for beginners
If you’re like me, you’ve balanced your phone on a stack of books to make a video. It works but doesn’t offer a lot of versatility compared with a physical stand or tripod, which can cost as little as $10.
After sound, what most first-time videographers get wrong is lighting. Natural light is your best bet, but even when you have a window nearby, you can still have strong shadows or strange glares that pop up on video. I use a mount I bought on Amazon for about $35 that has a light built into it. Other options such as ring lights and softbox lighting kits make your subjects look their best in video and can cost less than $50.
If you’re handy, there are a lot of DIY solutions to lighting that you can make with items around the house or from your local hardware store. There are great video tutorials on YouTube to help you out, including “Quick Tips: DIY Lighting Kit!”
I’ve never used a formal backdrop or green screen in my videos because I think an informal background can make the video feel more personal for the viewer. That’s why most of the videos I’ve made were done in my office. Plus, since my members know my staff and me and have likely come to our small offices, it adds a level of familiarity. If your office isn’t suitable, there are easy backdrop options you can make and some kits that include a green screen plus lights on Amazon for less than $100.
“Our annual member communication survey identified our video program as one of the top benefits of membership.” — Steve Klaniecki, director of marketing and communications, Washington REALTORS®
After sound, lights, and a camera, the piece of equipment that will save you tons of time and effort and take your videos to the next level is a teleprompter. In its most basic form, it’s a simple and free or inexpensive laptop or tablet app (such as Teleprompter Pro, QuotTeleprompter, and VoicePrompt) that slowly scrolls the text you need to read across your screen. Of course, you should practice the text a few times to sound more natural when you’re reading, but a teleprompter helps you stay on track, keeps you from looking down at notes, and saves you from multiple retakes for forgetting what to say.
Video editing is the most time-consuming step
Now that you’ve filmed, you’re only halfway there. Gone are the days when you could sit in front of a camera and just talk for two to five minutes, then upload that video to YouTube and be done.
As we’re inundated with video, studies have shown that our attention spans have shortened. Members are used to videos that offer variety of shot styles and things to look at besides just a talking head.
You need to learn editing software—there’s no way around it. But don’t worry; the basic programs today are easy to use, and many of them are free.
I use Movavi, which costs me only $80. It’s easy to use and gives me the option to add text, such as captions showing who’s speaking, subtitles, transitions between shots, still photos, and graphics. There are great free video editing options you can even use on your smartphone, including iMovie that comes free on iPhones, or Windows Movie Maker, which is included with most editions of Windows.
To edit charts and infographics into your videos, just create them using any type of graphic tool, such as Photoshop or Canva, and drag and drop them into your video editing software. I use Canva for flyers, but it also works great to create stills for your video. The subscription version costs $12.95 a month and it is a very versatile program.
One last step in video production that is becoming increasingly popular is subtitles. Studies show that 85% of Facebook videos are watched without sound, so unless you have subtitles, you won’t reach a huge chunk of your audience. Each video editing program handles inserting subtitles differently, and it does take effort to write down everything said on the video, but it’s worth the time.
Once your video is done, you need to upload it online. YouTube is the clear choice for housing your videos because it’s free and makes sharing easy though social media, email, and on your website. Experts say, however, that when you upload a video directly to Facebook, the user experience is much better because the video is displayed as a full image across the timeline, it plays automatically in the news feed, and the organic reach is much greater. So consider uploading your videos separately to Facebook and Twitter.
Just do it
When it comes to association videos, don’t be afraid to start off small and build as you go.
“We started on a shoestring about 10 years ago,” says Klaniecki. “We purchased used equipment on eBay and used shop lights from Home Depot. Each year we added one or two new items to the studio and learned a couple of new tricks with the software.” Today, Washington REALTORS® has a dedicated studio, a soundproof audio booth and the equipment necessary for in-studio and on-location shoots. “Our annual member communication survey identified our video program as one of the top benefits of membership.”
Still leery about video? Consider reaching out to your local university or high school to see if any students want a project. Many will jump at the chance to gain experience for their resume, and they can acquaint you with the nuts and bolts of the process.